Highly Available Kubernetes Cluster
A comprehensive guide to setting up a production-ready, highly available Kubernetes cluster using kubeadm and kube-vip along with a secure bastion host.
Introduction
Creating a production-ready Kubernetes cluster involves much more than just connecting a few nodes together. For workloads that cannot tolerate downtime, a highly available (HA) configuration is essential. This guide walks you through creating a robust multi-master Kubernetes cluster using kubeadm and kube-vip on bare-metal infrastructure.
By the end of this tutorial, you’ll have a fault-tolerant Kubernetes cluster capable of withstanding the failure of any single control plane node without affecting your applications.
What is kubeadm?
Kubeadm is the official cluster bootstrapping tool for Kubernetes. It handles the critical components needed to establish a minimal viable cluster:
- Generating certificates for secure component communication
- Launching the control plane components (etcd, API server, scheduler, controller manager)
- Creating essential configuration files and service accounts
- Enabling cluster expansion through join tokens
Kubeadm follows best practices for cluster setup while providing flexibility through its modular approach to installation.
Why High Availability Matters
A standard single-master Kubernetes cluster creates a significant risk: if that master node fails, you lose the ability to manage your cluster until it recovers. For mission-critical workloads, this presents an unacceptable vulnerability.
A properly designed highly available setup eliminates this risk by:
- Running control plane components across multiple master nodes
- Implementing automatic failover mechanisms for the API server endpoint
- Distributing state across replicated etcd instances
- Ensuring continuous uptime for cluster management operations
Prerequisites
- A Linux server with SSH access. This will be the jump server.
- Minimum of 5 linux servers with SSH access. This will be the Kubernetes cluster.
- 3 master nodes with 4vCPU, 4GiB RAM and 100GiB disk for high availability. With k8s it is recommended to have an odd number of master nodes for high availability.
- 2 worker nodes with 8vCPU, 16GiB RAM and 100GiB disk for running the applications.
Environment
- 192.168.202.118 # Jump Server
- 192.168.202.43 # Master Node 1
- 192.168.202.39 # Master Node 2
- 192.168.202.123 # Master Node 3
- 192.168.202.64 # Worker Node 1
- 192.168.202.48 # Worker Node 2
Architecture Overview
The architecture we’ll implement consists of:
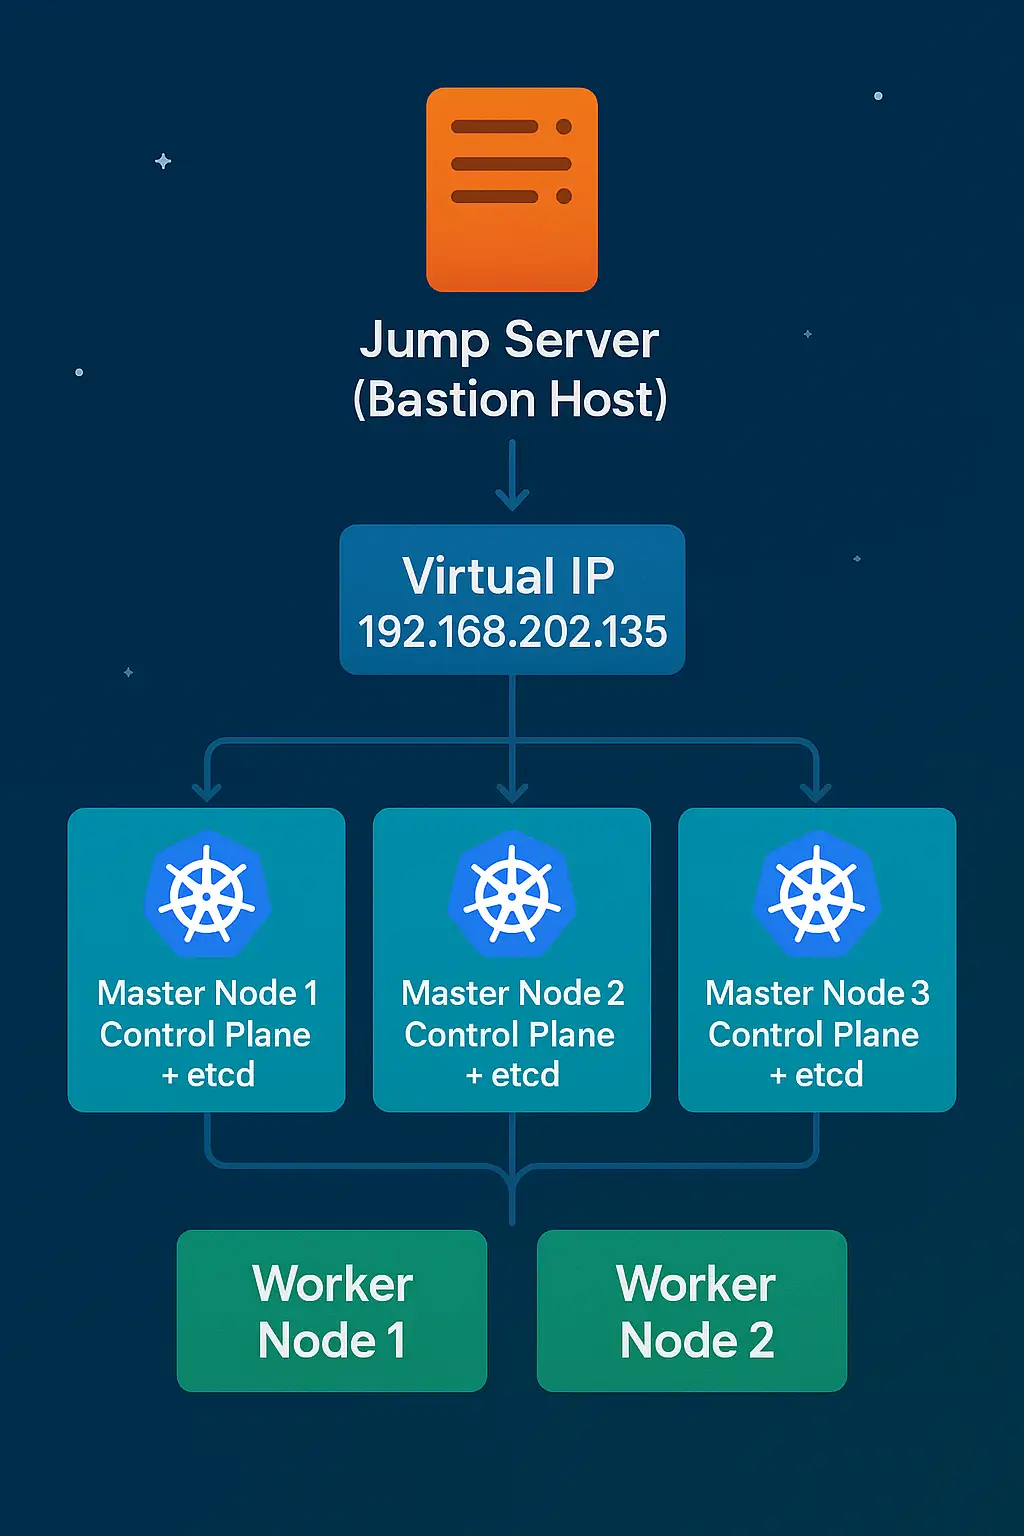
This architecture provides:
- Redundancy: No single point of failure in the control plane
- Load distribution: API requests spread across multiple control plane nodes
- Data durability: etcd runs as a cluster across multiple nodes
- Security: All administrative access flows through the jump server
Step 1: Preparing the jump server
Update the server and install the required packages:
1
2
3
4
sudo dnf update -y
sudo dnf install -y epel-release
sudo crb enable
sudo dnf install -y curl wget dnf-plugins-core
1.1: Configure SSH
Generate the SSH keys for the server. Make sure open-ssh is installed on your local machine. Open powershell or any terminal and use the following command to generate the SSH keys:
1
ssh-keygen -t rsa -C "serveradmin"
Add the public key to the kubernetes nodes. You can use the following command to copy the public key to the nodes:
1
ssh-copy-id -i ~/.ssh/id_rsa.pub serveradmin@<node_ip>
You can also use this bash script to copy the public key to all the nodes:
1
2
3
4
5
6
7
8
9
10
11
12
13
#!/bin/bash
nodes=(
  192.168.202.43
  192.168.202.39
  192.168.202.123
  192.168.202.64
  192.168.202.48
)

for ip in "${nodes[@]}"; do
  echo "Copying SSH key to $ip..."
  ssh-copy-id -i ~/.ssh/id_rsa.pub serveradmin@"$ip"
done
Make sure to give the script execute permissions:
1
2
chmod +x copy_ssh_key.sh
./copy_ssh_key.sh
1.2: Install kubectl
kubectl is the command line tool for interacting with the Kubernetes cluster. You can install kubectl using the following command:
1
2
3
4
5
6
7
8
9
10
11
12
13
14
export KUBERNETES_VERSION=1.31
# Make sure to install the correct version of kubectl that matches the version of kubeadm you will be using.
# Add the kubernetes repository
cat <<EOF | sudo tee /etc/yum.repos.d/kubernetes.repo
[kubernetes]
name=Kubernetes
baseurl=https://pkgs.k8s.io/core:/stable:/v$KUBERNETES_VERSION/rpm/
enabled=1
gpgcheck=1
gpgkey=https://pkgs.k8s.io/core:/stable:/v$KUBERNETES_VERSION/rpm/repodata/repomd.xml.key
EOF

# Install kubectl
sudo dnf install -y kubectl
Step 2: Preparing the Kubernetes nodes
Run these commands on all the kubernetes nodes.
2.1: Update the nodes and install prerequisite packages
1
2
3
4
5
sudo dnf install -y epel-release
sudo dnf config-manager --set-enabled crb
sudo dnf install -y curl wget dnf-plugins-core
sudo dnf install 'dnf-command(versionlock)' -y
sudo dnf update -y
2.2: Disable swap
1
2
3
sudo swapoff -a
# This will disable swap temporarily. To disable swap permanently, you can comment out the swap entry in /etc/fstab.
sudo sed -i '/ swap / s/^\(.*\)$/#\1/g' /etc/fstab
2.3: Disable SELinux
1
2
3
sudo setenforce 0
# This will disable SELinux temporarily. To disable SELinux permanently, you can set SELINUX=disabled in /etc/selinux/config.
sudo sed -i 's/^SELINUX=.*/SELINUX=disabled/' /etc/selinux/config
2.4: Prepare the kernel
1
2
3
4
5
6
7
8
9
10
11
12
13
14
sudo modprobe overlay
sudo modprobe br_netfilter
cat <<EOF | sudo tee /etc/modules-load.d/k8s.conf
overlay
br_netfilter
EOF
# Set sysctl params required by Kubernetes networking
cat <<EOF | sudo tee /etc/sysctl.d/k8s.conf
net.bridge.bridge-nf-call-iptables  = 1
net.bridge.bridge-nf-call-ip6tables = 1
net.ipv4.ip_forward                 = 1
EOF
# Apply sysctl params without reboot
sudo sysctl --system
2.5: Disable firewalld
1
2
sudo systemctl stop firewalld
sudo systemctl disable firewalld
2.6: Install containerd
I am using containerd as the container runtime. You can use any other container runtime of your choice. For other distributions, you can follow the official containerd installation guide: https://docs.docker.com/engine/install/
1
2
3
4
5
6
7
8
9
10
11
12
13
14
# Add docker repository
sudo dnf config-manager --add-repo https://download.docker.com/linux/rhel/docker-ce.repo
# Install containerd
sudo dnf install -y containerd.io
# Enable and start containerd
sudo systemctl enable containerd --now
# Create the containerd configuration file
containerd config default | sudo tee /etc/containerd/config.toml
# since we installed containerd from docker repository, we need to change the cgroup driver to systemd
sudo sed -i 's/            SystemdCgroup = false/            SystemdCgroup = true/' /etc/containerd/config.toml
# We also need to enable cri plugin
sudo sed -i '/disabled_plugins/ { s/\["cri"\]/[]/; s/\["cri",\]/[]/; s/\["cri",\([^]]*\)\]/[\1]/; s/\([^,]*\),\([^,]*\)/\1/ }' /etc/containerd/config.toml
# Restart containerd
sudo systemctl restart containerd
2.7: Install kubelet, kubeadm, kubectl
Add the kubernetes repository:
1
2
3
4
5
6
7
8
9
10
11
12
13
14
export KUBERNETES_VERSION=1.31
cat <<EOF | sudo tee /etc/yum.repos.d/kubernetes.repo
[kubernetes]
name=Kubernetes
baseurl=https://pkgs.k8s.io/core:/stable:/v$KUBERNETES_VERSION/rpm/
enabled=1
gpgcheck=1
gpgkey=https://pkgs.k8s.io/core:/stable:/v$KUBERNETES_VERSION/rpm/repodata/repomd.xml.key
EOF
sudo dnf install -y kubelet kubeadm kubectl
# Add versionlock to prevent unintented update
sudo dnf versionlock kubelet kubeadm kubectl
# start and enable kubelet
sudo systemctl enable kubelet && sudo systemctl start kubelet
Step 3: Installing kube-vip
SSH into the control-plane nodes. For a kubeadm cluster we need to initialize the cluster with a Virtual IP.
3.1: Generate kube-vip manifest
Run the following commands on all the control plane nodes only. Make sure to run these commands as root user.
1
2
3
4
5
6
7
8
9
10
11
12
13
14
15
16
17
# switch to root user
sudo su -
# Set the VIP address to be used for the control plane:
export VIP=192.168.202.135
# Set the INTERFACE name to the name of the interface on the control plane(s) which will announce the VIP. In many Linux distributions this can be found with the ip a command.
export INTERFACE=eth0
# Set the Kube-vip version
export KVVERSION=v0.8.2
# set alias for kube-vip
alias kube-vip="ctr image pull ghcr.io/kube-vip/kube-vip:$KVVERSION; ctr run --rm --net-host ghcr.io/kube-vip/kube-vip:$KVVERSION vip /kube-vip"
# Generate the manifest
kube-vip manifest pod \
    --interface $INTERFACE \
    --address $VIP \
    --controlplane \
    --arp \
    --leaderElection | tee /etc/kubernetes/manifests/kube-vip.yaml
3.2: Kube-VIP Issue #684 workaround
We cannot initialise the cluster just yet. We need to edit the kube-vip.yaml manifest to work around the issue #684 for kube-vip. Run this command on the first control plane node only:
1
2
sed -i 's#path: /etc/kubernetes/admin.conf#path: /etc/kubernetes/super-admin.conf#' \
          /etc/kubernetes/manifests/kube-vip.yaml
Step 4: Creating the cluster
4.1: Initializing the cluster with kubeadm
On the same control plane node, as root user run these commands:
1
2
3
export VIP=192.168.202.135
export POD_CIDR=172.16.0.0/16
export SERVICE_CIDR=10.96.0.0/12
Make sure to set the POD_CIDR value to a different range than your local network. My local network is 192.168.x.x hence I am using 172.16.0.0/16. If your local network is 10.96.0.0/12 then you need to replace the value of SERVICE_CIDR with a different address range.
Initialize the cluster with the following command:
1
kubeadm init --control-plane-endpoint=$VIP --pod-network-cidr=$POD_CIDR --service-cidr=$SERVICE_CIDR --upload-certs
The cluster creation can take a few minutes. On a successful cluster creation you will see something like this:
1
2
3
4
5
6
7
8
9
10
11
12
13
14
15
16
17
18
Your Kubernetes control-plane has initialized successfully!

....

You can now join any number of control-plane nodes running the following command on each as root:

  kubeadm join 192.168.202.135:6443 --token o9ngpq.85gyedkekgauleff \
        --discovery-token-ca-cert-hash sha256:eba94d01129... \
        --control-plane --certificate-key e8f9d363e3b523...

Please note that the certificate-key gives access to cluster sensitive data, keep it secret!
As a safeguard, uploaded-certs will be deleted in two hours; If necessary, you can use
"kubeadm init phase upload-certs --upload-certs" to reload certs afterward.

Then you can join any number of worker nodes by running the following on each as root:

kubeadm join 192.168.202.135:6443 --token o9ngpq.85gyedkekgauleff \
        --discovery-token-ca-cert-hash sha256:eba94d01129....
Copy and save both the kubeadm join commands as we will use them in the next steps. Check the nodes in the cluster by running:
1
2
export KUBECONFIG=/etc/kubernetes/admin.conf
kubectl get nodes
You will see one node in NotReady state. It is because there is no container networking installed in our cluster yet.
4.2: Revert the changes we made to the kube-vip manifest
1
2
sed -i 's#path: /etc/kubernetes/super-admin.conf#path: /etc/kubernetes/admin.conf#' \
          /etc/kubernetes/manifests/kube-vip.yaml
4.3: Installing Container Networking (CNI)
There are many options to choose when it comes to CNI such as Flannel, Calico, Cilium, etc. For this cluster we will be using Calico:
1
2
3
4
5
6
# Download Calico manifest
curl https://raw.githubusercontent.com/projectcalico/calico/v3.29.3/manifests/calico.yaml -O
# Apply the calico manifest
kubectl apply -f calico.yaml
# Once the pods are running, you can check the status of the nodes. You should see all the nodes in Ready state.
kubectl get nodes
4.4: Join the control plane nodes
Run the kubeadm join command on the other control plane nodes. Make sure to use the certificate-key from the first control plane node. Use the command we saved earlier:
1
2
3
4
5
6
7
8
9
sudo su -
kubeadm join 192.168.202.135:6443 --token 2uiyif.qodrgesw4q6rjoe2 --discovery-token-ca-cert-hash sha256:eba94d01129e... --control-plane --certificate-key b7c587f527ce9ab791....
#! make sure to include the --control-plane and --certificate-key flags
# Check the status of the nodes
kubectl get nodes
NAME                STATUS   ROLES           AGE     VERSION
cp1.plutolab.live   Ready    control-plane   9m43s   v1.31.2
cp2.plutolab.live   Ready    control-plane   2m55s   v1.31.2
cp3.plutolab.live   Ready    control-plane   61s     v1.31.2
4.5: Join the worker nodes
Run the kubeadm join command on the worker nodes. Use the command we saved earlier:
1
2
3
4
5
6
7
8
9
10
sudo su -
kubeadm join 192.168.202.135:6443 --token 2uiyif.qodrgesw4q6rjoe2 --discovery-token-ca-cert-hash sha256:eba94d01129e...
# Check the status of the nodes
kubectl get nodes
NAME                  STATUS   ROLES           AGE     VERSION
cp1.plutolab.live     Ready    control-plane   12m     v1.31.2
cp2.plutolab.live     Ready    control-plane   5m18s   v1.31.2
cp3.plutolab.live     Ready    control-plane   3m24s   v1.31.2
work1.plutolab.live   Ready    <none>          90s     v1.31.2
work2.plutolab.live   Ready    <none>          83s     v1.31.2
4.6: Copy the kubeconfig file to the jump server
1
2
3
4
5
6
7
8
9
10
11
# On the control plane run
cp /etc/kubernetes/admin.conf /home/serveradmin/kubeconfig.conf
chown serveradmin:serveradmin /home/serveradmin/kubeconfig.conf
# On the jump server run
scp serveradmin@<control_plane_1_ip>:/home/serveradmin/kubeconfig.conf /home/serveradmin/.kube/config
# Make sure to set the correct permissions for the kubeconfig file
chmod 600 /home/serveradmin/.kube/config
# Make sure to set the correct ownership for the kubeconfig file
chown serveradmin:serveradmin /home/serveradmin/.kube/config
# Test the connection to the cluster
kubectl get nodes
Testing High Availability
To properly validate your highly available Kubernetes cluster, you should test several failure scenarios to ensure cluster resilience.
Test 1: Control Plane Node Failure
Simulate a failure by shutting down one of the master nodes:
1
2
3
4
5
# SSH to one of the master nodes
ssh [email protected]

# Shutdown the node
sudo shutdown -r now
During this time:
- Verify the Virtual IP remains accessible:
ping 192.168.202.135 - Check that you can still interact with the cluster:
1 2
kubectl get nodes kubectl get pods -A - Verify etcd maintains quorum (from a healthy control plane node):
1
2
3
4
5
6
sudo crictl exec -it $(sudo crictl ps -q --name etcd) etcdctl \
  --endpoints=https://127.0.0.1:2379 \
  --cacert=/etc/kubernetes/pki/etcd/ca.crt \
  --cert=/etc/kubernetes/pki/etcd/server.crt \
  --key=/etc/kubernetes/pki/etcd/server.key \
  endpoint health --cluster
Test 2: Create a Test Deployment During Node Outage
While one control plane node is down, create a simple deployment to verify that the cluster remains operational:
1
2
3
4
5
6
7
8
9
10
11
# Create a test nginx deployment
kubectl create deployment nginx --image=nginx --replicas=3

# Verify pods are being created and scheduled
kubectl get pods

# Expose the deployment as a service
kubectl expose deployment nginx --port=80 --type=ClusterIP

# Verify the service is created
kubectl get svc nginx
This confirms that all control plane functions (API server, scheduler, controller manager) continue to work properly.
Test 3: Re-joining the Failed Node
After the previously failed node comes back online, verify it automatically rejoins the cluster:
1
2
3
4
5
# Check node status
kubectl get nodes

# Verify all control plane pods are running on the rejoined node
kubectl get pods -n kube-system -o wide | grep 192.168.202.43
These tests validate that your Kubernetes cluster can maintain operations during control plane failures, which is the core promise of a highly available setup.
Common Issues & Troubleshooting
When building a highly available Kubernetes cluster, you might encounter several common issues. Here’s how to address them:
Certificate Issues
If you see errors related to certificates when joining control plane nodes:
1
[ERROR CertificateKey] Error verifying certificates: decryption failed after 5 attempts: crypto/aes: invalid key size 0
Solution: The certificate key is only valid for 2 hours. Generate a new one:
1
2
3
# On an existing control plane node
sudo kubeadm init phase upload-certs --upload-certs
# Use the new certificate key in your join command
Kube-VIP Not Working
If the VIP is not accessible:
Solutions:
- Verify the interface specified matches the actual network interface name:
1
ip a
- Check kube-vip logs:
1
kubectl -n kube-system logs -l k8s-app=kube-vip
- Ensure ARP mode is enabled in the kube-vip manifest and all control plane nodes can reach each other.
Calico Networking Issues
If pods can’t communicate across nodes:
Solutions:
- Ensure the pod CIDR doesn’t overlap with your network:
1
2
kubectl get pods -n kube-system -l k8s-app=calico-node
kubectl logs -n kube-system <calico-pod-name>
- Verify BGP peering is established:
1
kubectl -n kube-system exec -it <calico-pod-name> -- calico-node -bird-status
Token Expired
If your join token has expired (valid for 24 hours):
Solution: Create a new token:
1
2
# On the control plane
sudo kubeadm token create --print-join-command
Node Not Ready Status
If nodes remain in NotReady status:
Solutions:
- Check kubelet status:
1
2
sudo systemctl status kubelet
sudo journalctl -u kubelet
- Verify container runtime is working:
1
sudo crictl info
Remember that troubleshooting Kubernetes often requires examining logs across multiple components, so use kubectl logs and journalctl liberally.
Conclusion
You’ve now successfully set up a highly available Kubernetes cluster using kubeadm. You can now deploy your applications on the cluster.
With this highly available foundation, your Kubernetes infrastructure is now ready to reliably run mission-critical workloads.
References
- Official Kubernetes Documentation on High Availability
- kubeadm Documentation
- kube-vip Project
- Calico Installation Guide
- etcd Documentation
- Container Runtime Interface (CRI) Documentation
Next Steps
Now that you have a highly available Kubernetes cluster, consider implementing these additional components:
- External Load Balancer: Use MetalLB for bare-metal load balancer services
- Ingress Controller: Deploy Traefik or NGINX for HTTP/HTTPS routing
- Storage Solution: Configure Longhorn or Rook-Ceph for persistent storage
- Monitoring Stack: Set up Prometheus and Grafana to monitor your cluster
- Backup Solution: Implement Velero for cluster backups