Harbor Registry with Pull-Through Cache for Docker Hub
Setting up a Harbor registry with a pull-through cache for Docker Hub to optimize container image management
Overview
This guide walks you through setting up Harbor Registry - an enterprise-grade container image registry - with a pull-through cache for Docker Hub. This setup improves your organization’s container workflow by:
- Providing a secure, private registry for your container images
- Reducing bandwidth consumption with local caching
- Avoiding Docker Hub rate limits
- Enabling image vulnerability scanning and policy enforcement
What is Harbor?
Harbor is an open source registry that secures artifacts with policies and role-based access control, ensures images are scanned and free from vulnerabilities, and signs images as trusted. Harbor, a CNCF Graduated project, delivers compliance, performance, and interoperability to help you consistently and securely manage artifacts across cloud native compute platforms like Kubernetes and Docker.
Prerequisites
Before starting installation, ensure you have:
- A Linux server (This guide uses Ubuntu 24.04)
- System requirements:
- 8GB+ RAM
- 4+ CPUs
- 160GB+ disk space
- Required network ports:
- 80 (HTTP)
- 443 (HTTPS)
- 4443 (Harbor internal HTTPS)
- DNS entry for the registry
- Example:
harbor.plutolab.livepointing to your server’s IP address
- Example:
- Dedicated storage volume for registry data (mounted at
/mnt/harbor)
Step 1: Prepare the Storage Disk
Create the mount point and set up the disk using LVM for better disk space management:
1
sudo mkdir -p /mnt/harbor
Setup the disk using LVM:
1
2
3
4
5
sudo pvcreate /dev/sdb
sudo vgcreate harbor-vg /dev/sdb
sudo lvcreate -l 100%FREE -n harbor-lv harbor-vg
sudo mkfs.ext4 /dev/harbor-vg/harbor-lv
sudo mount /dev/harbor-vg/harbor-lv /mnt/harbor
Make persistent across reboots by adding an entry to /etc/fstab:
1
2
3
echo "/dev/harbor-vg/harbor-lv /mnt/harbor ext4 defaults 0 0" | sudo tee -a /etc/fstab
sudo systemctl daemon-reload
sudo mount -a
Step 2: Install Docker and Docker Compose
Docker and Docker Compose are prerequisites for running Harbor. Follow these steps to install them on Ubuntu 24.04:
1
2
3
4
5
6
7
8
9
10
11
12
13
14
15
16
17
18
19
20
21
22
23
24
25
# Update package index and install required dependencies
sudo apt-get update
sudo apt-get install -y ca-certificates curl gnupg lsb-release

# Add Docker's official GPG key
sudo install -m 0755 -d /etc/apt/keyrings
sudo curl -fsSL https://download.docker.com/linux/ubuntu/gpg -o /etc/apt/keyrings/docker.asc
sudo chmod a+r /etc/apt/keyrings/docker.asc

# Add the Docker repository
echo \
  "deb [arch=$(dpkg --print-architecture) signed-by=/etc/apt/keyrings/docker.asc] https://download.docker.com/linux/ubuntu \
  $(. /etc/os-release && echo "${VERSION_CODENAME}") stable" | \
  sudo tee /etc/apt/sources.list.d/docker.list > /dev/null

# Update package index again and install Docker components
sudo apt-get update
sudo apt-get install -y docker-ce docker-ce-cli containerd.io docker-buildx-plugin docker-compose-plugin

# Start Docker and enable it to run on system boot
sudo systemctl enable docker --now

# Verify the installation
docker --version
docker compose version
Note: Docker Compose is included in the Docker CLI as of Docker version 20.10.13 as the
docker composecommand.
Step 3: Install Harbor
3.1 Download Harbor Installer
Download the latest version of Harbor from the official GitHub releases page:
1
wget https://github.com/goharbor/harbor/releases/download/v2.13.0/harbor-online-installer-v2.13.0.tgz
3.2 Extract the Harbor Installer
Extract the downloaded tarball:
1
2
tar -xvzf harbor-online-installer-v2.13.0.tgz
cd harbor
3.3 Prepare SSL Certificates
Harbor requires SSL certificates for secure communication. You can either:
- Use certificates from a trusted Certificate Authority (recommended for production)
- Generate self-signed certificates (suitable for testing)
For this guide, we’ll create self-signed certificates:
1
2
3
4
5
6
7
8
9
10
11
12
13
14
15
16
17
18
19
20
21
# Create certificates directory
mkdir -p /mnt/harbor/certs
cd /mnt/harbor/certs

# Generate CA certificate private key
sudo openssl genrsa -out ca.key 4096

# Generate the CA certificate
# Replace plutolab.live with your domain
sudo openssl req -x509 -new -nodes -sha512 -days 3650 \
 -subj "/C=US/ST=State/L=City/O=Organization/OU=DevOps/CN=harbor.plutolab.live" \
 -key ca.key \
 -out ca.crt

# Generate server certificate private key
sudo openssl genrsa -out harbor.plutolab.live.key 4096

# Generate certificate signing request (CSR)
sudo openssl req -sha512 -new -key harbor.plutolab.live.key \
 -subj "/C=US/ST=State/L=City/O=Organization/OU=DevOps/CN=harbor.plutolab.live" \
 -out harbor.plutolab.live.csr
Create a configuration file for Subject Alternative Name (SAN) extension:
1
2
3
4
5
6
7
8
9
10
11
12
sudo tee v3.ext > /dev/null <<-EOF
authorityKeyIdentifier=keyid,issuer
basicConstraints=CA:FALSE
keyUsage = digitalSignature, nonRepudiation, keyEncipherment, dataEncipherment
extendedKeyUsage = serverAuth
subjectAltName = @alt_names

[alt_names]
DNS.1=harbor.plutolab.live
# Add more DNS entries if needed
# DNS.2=harbor-test.plutolab.live
EOF
Generate the server certificate:
1
2
3
4
5
sudo openssl x509 -req -sha512 -days 3650 \
    -extfile v3.ext \
    -CA ca.crt -CAkey ca.key -CAcreateserial \
    -in harbor.plutolab.live.csr \
    -out harbor.plutolab.live.crt
3.4 Configure Harbor
Harbor is configured through the harbor.yml file. Create your configuration by copying the template:
1
2
cd ~/harbor
cp harbor.yml.tmpl harbor.yml
Edit the harbor.yml file with your preferred text editor and update the following key configurations:
1
2
3
4
5
6
7
8
9
10
11
12
13
14
15
16
17
18
19
20
21
22
23
24
25
# Core configuration
hostname: harbor.plutolab.live  # Replace with your domain

# HTTPS configuration
https:
  port: 443
  certificate: /mnt/harbor/certs/harbor.plutolab.live.crt
  private_key: /mnt/harbor/certs/harbor.plutolab.live.key

# Storage location
data_volume: /mnt/harbor

# Database password - change these from default values
database:
  password: securepassword  # Use a strong password
  max_idle_conns: 100
  max_open_conns: 900

# Admin password for initial login
harbor_admin_password: StrongAdminPassword  # Use a strong password

# Other settings to consider:
# trivy:
#   ignore_unfixed: true  # Whether to ignore vulnerabilities with no fix
#   skip_update: false    # Whether to skip database updates
Security Note: Change all default passwords to strong, unique values. The admin password will only be valid for first login, and you’ll be prompted to change it. However, other passwords like the database password should be properly secured.
3.5 Add Certificates to Docker Trust Store
For Docker to trust your Harbor registry with HTTPS, you need to add the certificates to Docker’s trust store:
1
2
3
4
5
6
7
8
9
10
11
# Convert certificate to the format Docker expects
cd /mnt/harbor/certs
sudo openssl x509 -inform PEM -in harbor.plutolab.live.crt -out harbor.plutolab.live.cert

# Create certificate directory for your Harbor domain
sudo mkdir -p /etc/docker/certs.d/harbor.plutolab.live

# Copy certificates to Docker's trusted certificates directory
sudo cp /mnt/harbor/certs/ca.crt /etc/docker/certs.d/harbor.plutolab.live/
sudo cp /mnt/harbor/certs/harbor.plutolab.live.cert /etc/docker/certs.d/harbor.plutolab.live/
sudo cp /mnt/harbor/certs/harbor.plutolab.live.key /etc/docker/certs.d/harbor.plutolab.live/
Your certificate directory structure should look like this:
1
2
3
4
5
/etc/docker/certs.d/
└── harbor.plutolab.live/
    ├── ca.crt
    ├── harbor.plutolab.live.cert
    └── harbor.plutolab.live.key
Restart Docker to apply the changes:
1
sudo systemctl restart docker
Note for Client Systems: Any client system that needs to interact with your Harbor registry must also trust your certificates. On Ubuntu clients, copy
ca.crtto/usr/local/share/ca-certificates/harbor-ca.crtand runsudo update-ca-certificates.
3.6 Install Harbor
Now that everything is configured, install Harbor:
1
2
cd ~/harbor
sudo ./install.sh
The installation might take a few minutes as it downloads Docker images. After installation completes, verify that all Harbor services are running properly:
1
2
cd ~/harbor
sudo docker compose ps
You should see multiple containers running with status Up, including:
- harbor-portal
- harbor-core
- harbor-jobservice
- nginx
- harbor-db
- registry
- redis
- registryctl
- harbor-log
If any service is not running, check the logs with:
1
sudo docker compose logs <service-name>
Access the Harbor web interface at https://harbor.plutolab.live and log in with:
- Username:
admin - Password: The one you set in
harbor.yml

After first login, you’ll be prompted to change the admin password.
Step 4: Configure Pull-Through Cache for Docker Hub
Harbor’s pull-through cache feature enables you to transparently proxy and cache container images from Docker Hub. This provides several benefits:
- Reduced bandwidth consumption: Images are downloaded only once and cached locally
- Faster builds and deployments: Cached images are served from your local network
- Avoid Docker Hub rate limits: Particularly important for free Docker Hub accounts
- Central control: Apply policies to all images, even third-party ones
4.1 Create a Registry Endpoint
- Log in to Harbor web interface at
https://harbor.plutolab.live - Navigate to Administration → Registries
- Click + New Endpoint
- Configure the endpoint with these settings:
- Provider: Docker Hub
- Name: dockerhub-cache
- Endpoint URL:
https://hub.docker.com(should be auto-filled) - Access ID: Your Docker Hub username (optional but recommended)
- Access Secret: Your Docker Hub password or access token (optional but recommended)
- Skip Certificate Verification: Leave unchecked unless required
- Click Test Connection to verify connectivity
- Click OK to save the endpoint
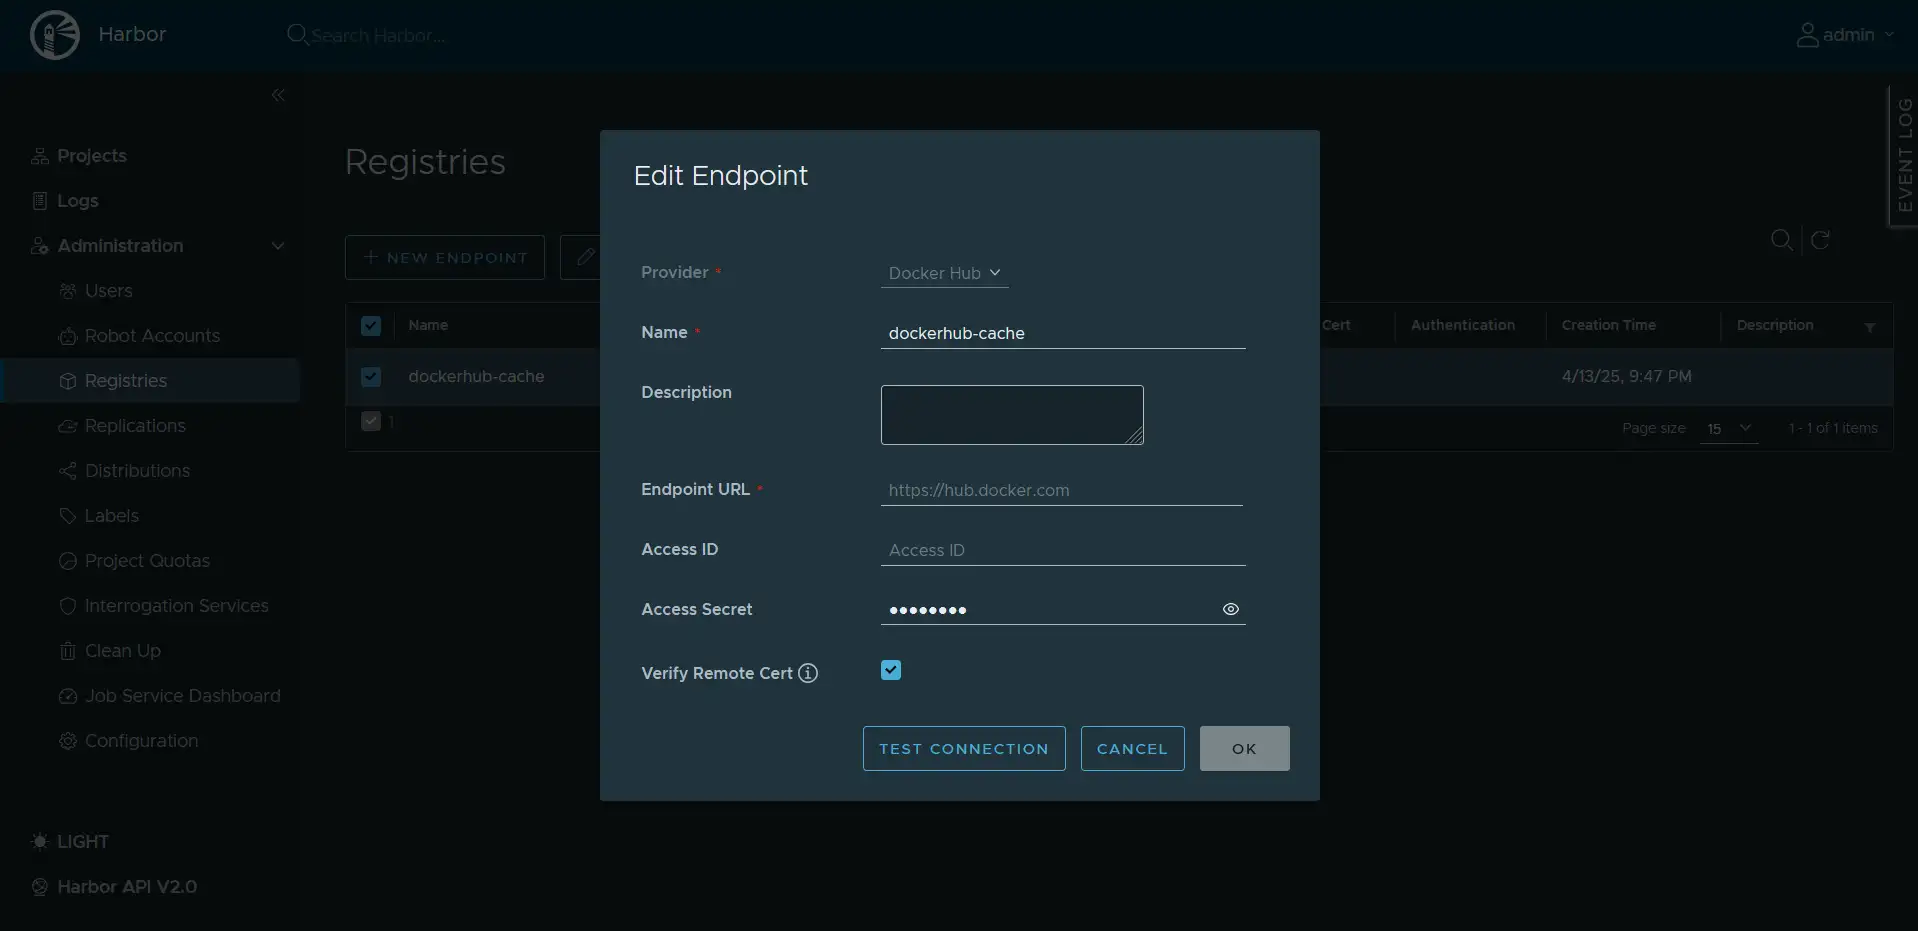
Pro Tip: For production use, create a dedicated Docker Hub service account with read-only access instead of using your personal credentials.
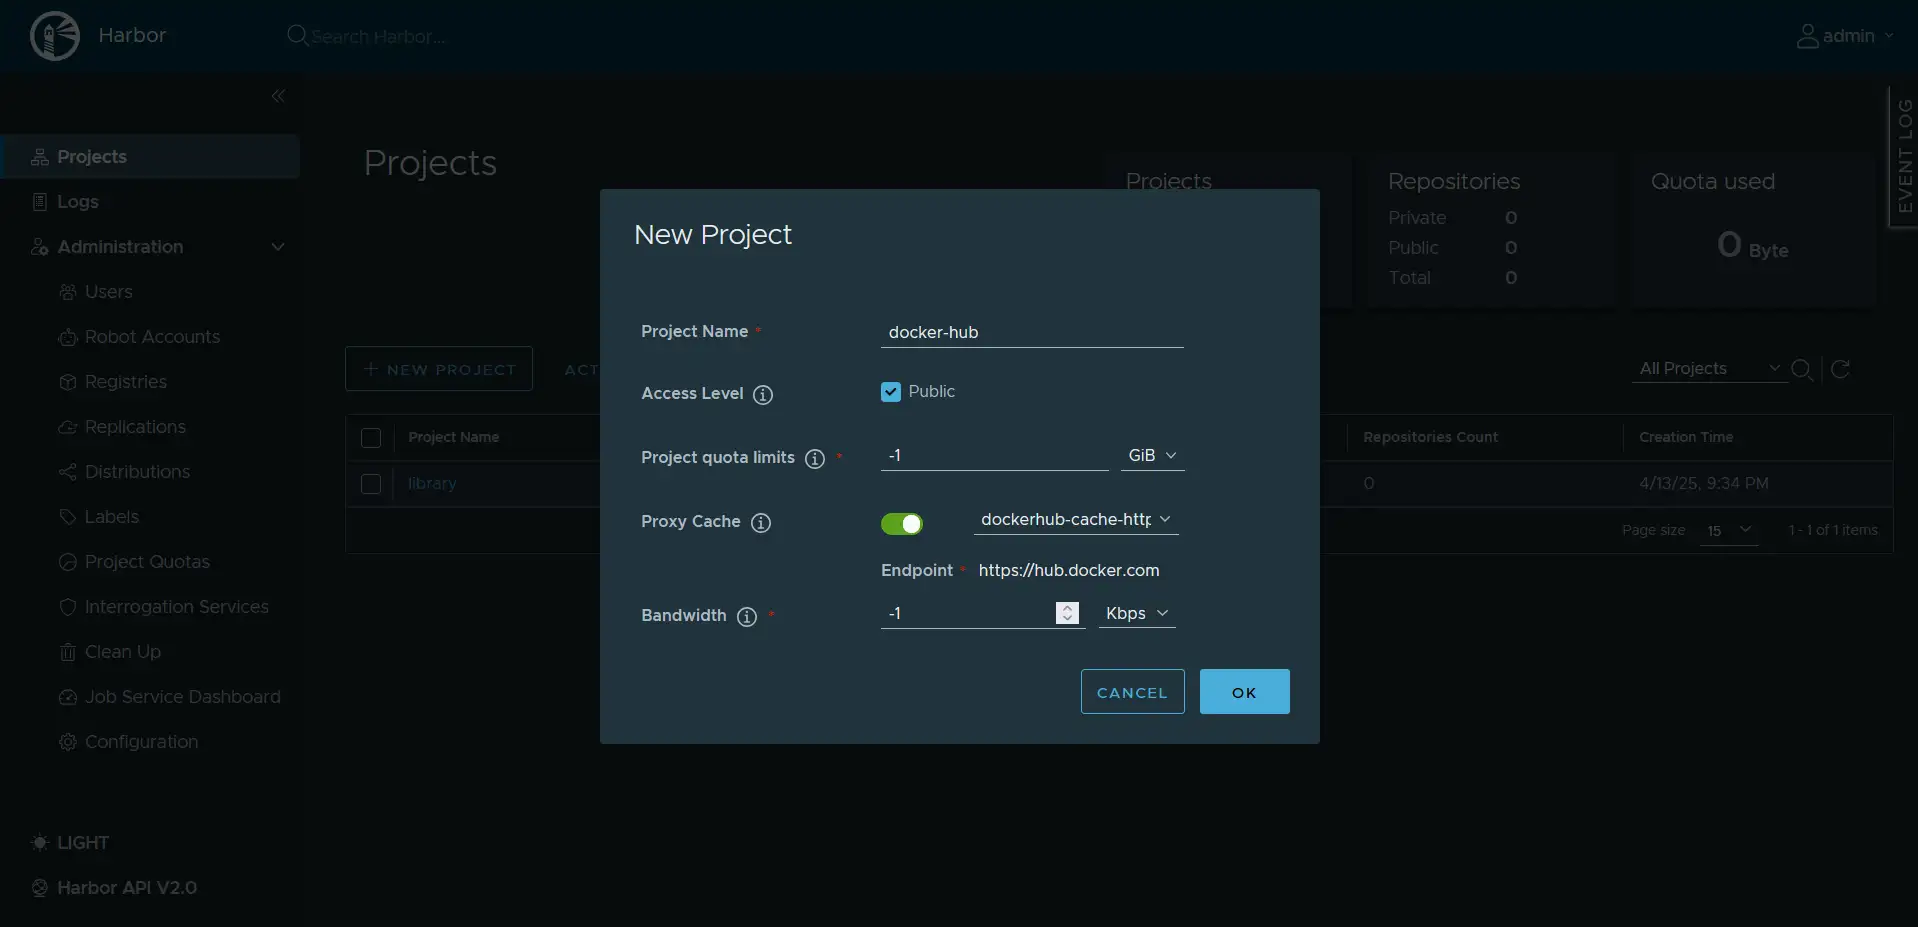
4.2 Create a Pull-Through Cache Project
- Navigate to Projects and click + New Project
- Configure the project:
- Project Name: docker-hub (or any name you prefer)
- Access Level: Public (recommended for shared access)
- Project Quota: Set according to your storage capacity (optional)
- Proxy Cache:
- Enable Proxy Cache
- Select dockerhub-cache as the registry
- Set Expiration Hours (default: 168 hours/7 days)
- Bandwidth (optional): Set a limit in KB/s (-1 means no limit)
- Click OK to create the project
4.3 Using the Pull-Through Cache
To use the pull-through cache, update your Docker image references to use your Harbor registry as prefix:
1
2
3
4
5
# Instead of:
# docker pull nginx:latest

# Use this format:
docker pull harbor.plutolab.live/docker-hub/nginx:latest
When you run this command:
- Docker client connects to your Harbor registry
- If the image exists in Harbor’s cache, it’s served directly
- If not, Harbor fetches it from Docker Hub, caches it, and serves it to you
You can also configure your Kubernetes deployments to use this registry by default.
4.4 Verify the Cache is Working
After pulling an image, verify it was cached:
- In Harbor, navigate to Projects → docker-hub → Repositories
- You should see the pulled image (e.g.,
nginx) in the list - Click on the repository name to see all cached tags
You can also verify with the Docker CLI:
1
2
# List all images from your Harbor registry
docker images | grep harbor.plutolab.live
Conclusion
You’ve successfully set up a Harbor registry with a pull-through cache for Docker Hub. This configuration provides significant benefits for container workflows:
- Local image caching improves performance
- Reduced external bandwidth usage
- Protection from Docker Hub rate limits
- Centralized image management
- Additional security through Harbor’s scanning capabilities
Consider expanding your setup by enabling Harbor’s vulnerability scanning features or integrating with your CI/CD pipeline for automated image publishing.