Longhorn: Implementing High-Availability Persistent Storage for Kubernetes
Persistent storage is critical for stateful applications running in Kubernetes environments. In this comprehensive guide, I'll walk you through setting up Longhorn, a CNCF-backed distributed block storage system designed specifically for Kubernetes. You'll learn how to implement highly available, replicated storage that can survive node failures while providing consistent performance for your applications.
What is Longhorn?
Longhorn is a CNCF Sandbox project that implements distributed block storage for Kubernetes. It creates persistent volumes that can be mounted as read-write by a single pod, providing:
- Volume replicas across multiple nodes
- Automated failover
- Simple UI for management
- Incremental snapshots and backups
- Volume expansion without downtime
Prerequisites
Before installing Longhorn, ensure your environment meets the following requirements:
- A working Kubernetes cluster (v1.21+). You can set up one by following my previous post on Kubernetes or using my ansible playbook for Kubernetes.
- Open-iSCSI installed and running on all nodes (required for CSI)
- NFSv4 client installed for backup functionality (optional)
kubectl(v1.21+) andhelm(v3.0+) installed and configured- Cluster admin privileges for deployment
You’ll also need to check if your kernel supports necessary modules like iscsiadm. Let’s verify this with a quick command on each node:
1
2
sudo apt-get update && sudo apt-get install -y open-iscsi || sudo yum install -y iscsi-initiator-utils
sudo systemctl enable --now iscsid
Step 1: Set up Disks
Ensure that your nodes have available disks. Longhorn can use any disk type, including local disks, cloud disks, or network-attached storage. In this example, we will use local disks. You can check the available disks using the following command:
1
lsblk
1
2
3
4
5
6
7
8
9
NAME   MAJ:MIN RM  SIZE RO TYPE MOUNTPOINTS
sda      8:0    0  100G  0 disk
├─sda1   8:1    0    2M  0 part
├─sda2   8:2    0  100M  0 part /boot/efi
├─sda3   8:3    0 1000M  0 part /boot
└─sda4   8:4    0 98.9G  0 part /var/lib/kubelet/pods/636270f2-9ba5-4973-ad3c-60c3f2a0a299/volume-subpaths/tigera-ca-bundle/calico-node/1
                                /
sdb      8:16   0  200G  0 disk
sr0     11:0    1  374K  0 rom
In this example, I have added a disk /dev/sdb to each worker node.
We will use LVM to create a volume group and logical volumes for Longhorn. LVM is convenient for managing disk space and allows for easy resizing of volumes.
Ensure that the lvm2 package is installed on your nodes. You can install it using the following command:
1
sudo dnf install lvm2
Create a mountpoint for the disks:
1
sudo mkdir /mnt/longhorn
Create a physical volume on the disk:
1
sudo pvcreate /dev/sdb
Create a volume group named longhorn-vg:
1
sudo vgcreate longhorn-vg /dev/sdb
Create a logical volume named longhorn-lv utilizing the entire volume group:
1
sudo lvcreate -n longhorn-lv -l 100%FREE longhorn-vg
Format the logical volume with a filesystem:
1
sudo mkfs.xfs /dev/longhorn-vg/longhorn-lv
Mount the logical volume to the mountpoint to verify that it works:
1
2
sudo mount /dev/longhorn-vg/longhorn-lv /mnt/longhorn
df -Th | grep longhorn
1
/dev/mapper/longhorn--vg-longhorn--lv xfs       200G  1.5G  199G   1% /mnt/longhorn
Make the mount persistent across reboots by adding it to /etc/fstab:
1
2
echo "/dev/longhorn-vg/longhorn-lv /mnt/longhorn xfs defaults 0 0" | sudo tee -a /etc/fstab
sudo systemctl daemon-reload
Test the fstab entry by unmounting and remounting:
1
2
sudo umount /mnt/longhorn
sudo mount -a
Step 2: Longhorn Pre-requisites
Before installing Longhorn, we need to prepare our nodes with the necessary dependencies. Longhorn provides a CLI tool that can validate your environment and help install required components.
SSH into your first master node and switch to root user:
1
2
sudo su -
export KUBECONFIG=/etc/kubernetes/admin.conf
Download the Longhorn CLI tool to check and prepare your environment:
1
2
curl -sSfL -o longhornctl https://github.com/longhorn/cli/releases/download/v1.8.1/longhornctl-linux-amd64
chmod +x longhornctl
Verify if your nodes meet the requirements for Longhorn installation:
1
./longhornctl check preflight
If there are any missing dependencies, you can install them automatically:
1
./longhornctl install preflight
Step 3: Install Longhorn using Helm
Longhorn can be installed using either kubectl with YAML manifests or the Helm package manager. For production environments, I recommend using Helm as it provides more configuration options and easier upgrades.
Method 1: Using kubectl (Quick Start)
For a quick installation with default settings:
1
kubectl apply -f https://raw.githubusercontent.com/longhorn/longhorn/v1.8.0/deploy/longhorn.yaml
Method 2: Using Helm (Recommended)
For more control over the installation and easier management:
1
2
3
# Add the Longhorn Helm repository
helm repo add longhorn https://charts.longhorn.io
helm repo update
Create a longhorn-values.yaml file with custom configuration
1
2
3
4
5
6
7
8
9
10
11
12
13
14
15
16
17
18
19
20
21
22
23
cat > longhorn-values.yaml << EOF
persistence:
  defaultClass: true
  defaultClassReplicaCount: 2 # Number of replicas for each volume. Make sure this is not greater than the number of worker nodes in your cluster.
  # -- Setting that allows you to enable live migration of a Longhorn volume from one node to another.
  migratable: true
  # -- Reclaim policy that provides instructions for handling of a volume after its claim is released. (Options: "Retain", "Delete")
  reclaimPolicy: Delete

defaultSettings:
  defaultreplicaCount: 2    # Number of replicas for each volume. Make sure this is not greater than the number of worker nodes in your cluster.
  # -- Default path for storing data on a host. The default value is "/var/lib/longhorn/".
  defaultDataPath: "/mnt/longhorn" # Path to the Longhorn data directory on each node. We created this in the previous steps.
  # -- Percentage of disk space that is not allocated to the default disk on each new Longhorn node.
  storageReservedPercentageForDefaultDisk: 0
EOF

# Install Longhorn with the custom values file
helm install longhorn longhorn/longhorn \
  --namespace longhorn-system \
  --create-namespace \
  --version 1.8.0 \
  -f longhorn-values.yaml
You can verify the installation status by checking the Longhorn namespace:
1
kubectl -n longhorn-system get pods
1
2
3
4
5
6
7
8
9
10
11
12
13
14
15
16
17
18
19
20
21
22
23
24
NAME                                                READY   STATUS    RESTARTS        AGE
csi-attacher-7744ffbff4-7v5z2                       1/1     Running   1 (94s ago)     3m48s
csi-attacher-7744ffbff4-nsh95                       1/1     Running   0               3m48s
csi-attacher-7744ffbff4-rgnp8                       1/1     Running   0               3m48s
csi-provisioner-6c6798d8f7-5h8lr                    1/1     Running   1 (84s ago)     3m48s
csi-provisioner-6c6798d8f7-9s4lx                    1/1     Running   0               3m48s
csi-provisioner-6c6798d8f7-h4s58                    1/1     Running   1 (81s ago)     3m48s
csi-resizer-65bb74cc75-lnrvm                        1/1     Running   1 (82s ago)     3m48s
csi-resizer-65bb74cc75-m4gnk                        1/1     Running   0               3m48s
csi-resizer-65bb74cc75-wd4gv                        1/1     Running   1 (81s ago)     3m48s
csi-snapshotter-874b9f887-7pvjg                     1/1     Running   1 (70s ago)     3m48s
csi-snapshotter-874b9f887-fc66g                     1/1     Running   1 (72s ago)     3m48s
csi-snapshotter-874b9f887-nlrk8                     1/1     Running   0               3m48s
engine-image-ei-c2d50bcc-czqgm                      1/1     Running   0               4m30s
engine-image-ei-c2d50bcc-xj6ns                      1/1     Running   0               4m30s
instance-manager-2fdf7bf415be9a0439e141db8f795b55   1/1     Running   0               4m
instance-manager-5ef4348de8b5e49374ff05134ab4f4ea   1/1     Running   0               3m59s
longhorn-csi-plugin-x9z8j                           3/3     Running   0               3m48s
longhorn-csi-plugin-z7wtm                           3/3     Running   0               3m48s
longhorn-driver-deployer-b8bc4675f-wz67w            1/1     Running   0               5m42s
longhorn-manager-2gg9k                              2/2     Running   0               5m42s
longhorn-manager-59vp8                              2/2     Running   1 (4m41s ago)   5m42s
longhorn-ui-7749bb466f-xkbcv                        1/1     Running   0               5m42s
longhorn-ui-7749bb466f-z64gr                        1/1     Running   0               5m42s
All pods should be in the Running state once the installation is complete.
Accessing the Longhorn UI
Longhorn provides an intuitive web interface for managing your volumes, snapshots, backups, and overall storage system. Here are multiple ways to access it:
Method 1: Using Port Forwarding (Quick Access)
For quick access during setup and testing, use kubectl port-forwarding:
1
kubectl port-forward -n longhorn-system service/longhorn-frontend 8000:80
Then open your browser and navigate to http://localhost:8000.
Method 2: Using IngressRoute
We have already installed Traefik with wildcard certificate in our cluster. If you haven’t done so, you can follow my previous post on Traefik to set it up.
Now we can set up an IngressRoute to expose the Longhorn UI. Using this method, you can access the Longhorn UI using a domain name with valid SSL certificates.
Create a new file named longhorn-ingressroute.yaml and add the following content:
1
2
3
4
5
6
7
8
9
10
11
12
13
14
15
16
apiVersion: traefik.io/v1alpha1
kind: IngressRoute
metadata:
  name: longhorn-frontend
  namespace: longhorn-system
  annotations:
    kubernetes.io/ingress.class: traefik-external
spec:
  entryPoints:
    - websecure
  routes:
    - match: Host(`longhorn.k8s.plutolab.live`)
      kind: Rule
      services:
        - name: longhorn-frontend
          port: 80
Apply the IngressRoute:
1
kubectl apply -f longhorn-ingressroute.yaml
Once the Ingress is set up, you can access the Longhorn UI at https://longhorn.k8s.plutolab.live.
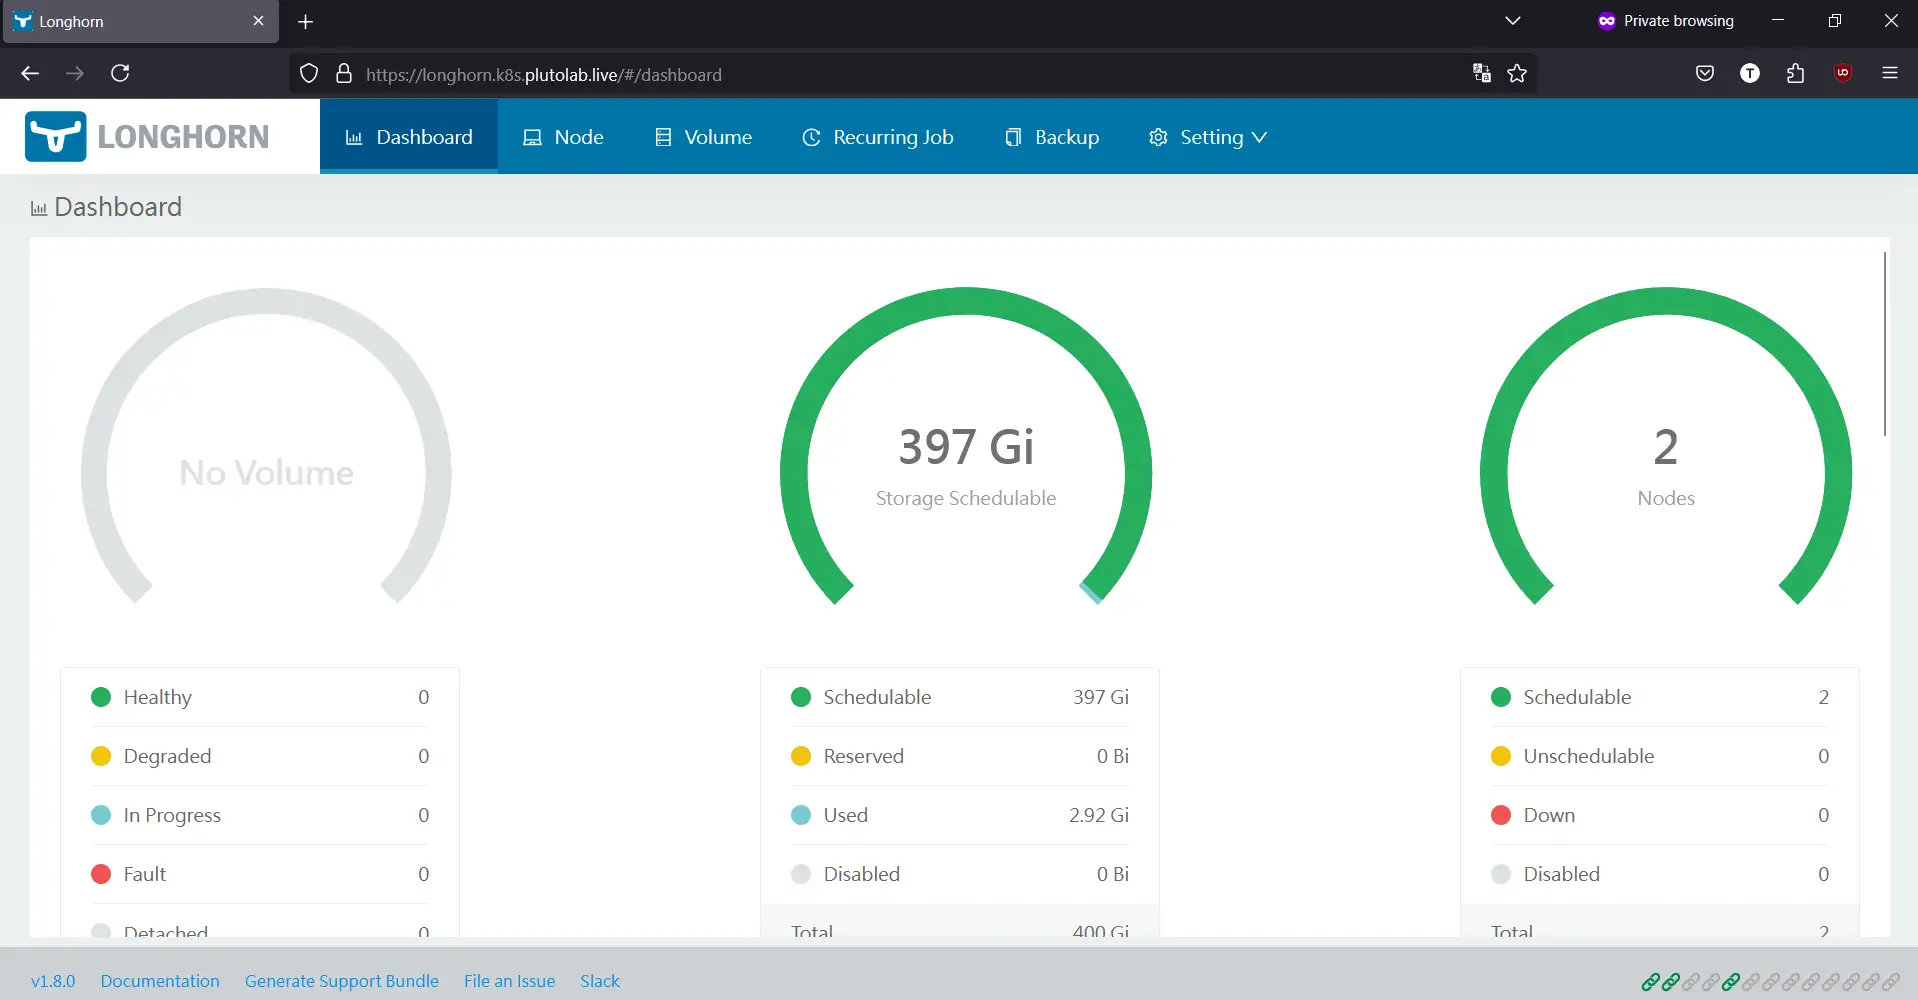 The Longhorn UI provides several key features:
- Dashboard with cluster storage overview
- Volume management (create, delete, attach, detach)
- Snapshot and backup management
- Node and disk management
- System and storage settings
Setting up Storage Classes
Longhorn automatically creates a default StorageClass named longhorn, but for production workloads, you’ll likely want to create custom storage classes with different performance and reliability characteristics.
Creating Custom Storage Classes
Here are some examples of specialized storage classes for different use cases:
High Availability Storage Class
Suitable for critical database workloads:
1
2
3
4
5
6
7
8
9
10
11
12
13
14
15
apiVersion: storage.k8s.io/v1
kind: StorageClass
metadata:
  name: longhorn-high-availability
  annotations:
    storageclass.kubernetes.io/is-default-class: "false"
provisioner: driver.longhorn.io
allowVolumeExpansion: true
parameters:
  numberOfReplicas: "3"
  staleReplicaTimeout: "30"
  diskSelector: "ssd"
  nodeSelector: "storage=true"
  fsType: "ext4"
  dataLocality: "best-effort"
Fast Storage for CI/CD
Optimized for build pipelines with fewer replicas:
1
2
3
4
5
6
7
8
9
10
11
apiVersion: storage.k8s.io/v1
kind: StorageClass
metadata:
  name: longhorn-fast-single-replica
provisioner: driver.longhorn.io
allowVolumeExpansion: true
parameters:
  numberOfReplicas: "1"
  staleReplicaTimeout: "30"
  diskSelector: "nvme"
  fsType: "xfs"
Backup From Snapshot
Create volumes from existing backups:
1
2
3
4
5
6
7
8
apiVersion: storage.k8s.io/v1
kind: StorageClass
metadata:
  name: longhorn-from-backup
provisioner: driver.longhorn.io
parameters:
  numberOfReplicas: "3"
  fromBackup: "s3://backups/pvc-backup?ver=1"
Setting a Default Storage Class
If you want to make your custom storage class the default:
1
2
3
4
5
# First, unset the current default storage class
kubectl patch storageclass longhorn -p '{"metadata": {"annotations":{"storageclass.kubernetes.io/is-default-class":"false"}}}'

# Then set your custom one as default
kubectl patch storageclass longhorn-high-availability -p '{"metadata": {"annotations":{"storageclass.kubernetes.io/is-default-class":"true"}}}'
This ensures that any PVC created without explicitly specifying a storage class will use your preferred configuration.
Creating a Persistent Volume Claim
Persistent Volume Claims (PVCs) are how applications request storage from Longhorn. Here are examples for different use cases:
Basic PVC Example
1
2
3
4
5
6
7
8
9
10
11
apiVersion: v1
kind: PersistentVolumeClaim
metadata:
  name: longhorn-basic-pvc
spec:
  accessModes:
    - ReadWriteOnce  # RWO is most common and widely supported
  storageClassName: longhorn
  resources:
    requests:
      storage: 10Gi
Production Database PVC
For a database like PostgreSQL that needs high-performance storage:
1
2
3
4
5
6
7
8
9
10
11
12
13
14
apiVersion: v1
kind: PersistentVolumeClaim
metadata:
  name: postgres-data
  annotations:
    # Snapshot annotation enables automatic backup
    longhorn.io/recurring-backup: name=daily,schedule="0 0 * * *",retain=7
spec:
  accessModes:
    - ReadWriteOnce
  storageClassName: longhorn-high-availability
  resources:
    requests:
      storage: 50Gi
Restore From Backup
To create a PVC from an existing backup:
1
2
3
4
5
6
7
8
9
10
11
apiVersion: v1
kind: PersistentVolumeClaim
metadata:
  name: restored-volume
spec:
  accessModes:
    - ReadWriteOnce
  storageClassName: longhorn-from-backup
  resources:
    requests:
      storage: 20Gi
Using PVCs in Deployments
Here are examples of how to use Longhorn volumes in different deployment scenarios:
Basic Nginx Example
1
2
3
4
5
6
7
8
9
10
11
12
13
14
15
16
17
18
19
20
21
22
23
24
25
26
apiVersion: apps/v1
kind: Deployment
metadata:
  name: nginx-longhorn
spec:
  selector:
    matchLabels:
      app: nginx-longhorn
  replicas: 1
  template:
    metadata:
      labels:
        app: nginx-longhorn
    spec:
      containers:
      - name: nginx
        image: nginx:stable
        ports:
        - containerPort: 80
        volumeMounts:
        - name: longhorn-vol
          mountPath: /usr/share/nginx/html
      volumes:
      - name: longhorn-vol
        persistentVolumeClaim:
          claimName: longhorn-basic-pvc
StatefulSet for Databases
StatefulSets are ideal for databases and other stateful applications:
1
2
3
4
5
6
7
8
9
10
11
12
13
14
15
16
17
18
19
20
21
22
23
24
25
26
27
28
29
30
31
32
33
34
35
36
37
38
39
40
41
42
43
44
45
46
apiVersion: apps/v1
kind: StatefulSet
metadata:
  name: postgresql
spec:
  serviceName: postgresql-headless
  replicas: 1
  selector:
    matchLabels:
      app: postgresql
  template:
    metadata:
      labels:
        app: postgresql
    spec:
      containers:
      - name: postgresql
        image: postgres:15
        env:
        - name: POSTGRES_PASSWORD
          valueFrom:
            secretKeyRef:
              name: postgres-secret
              key: postgres-password
        ports:
        - containerPort: 5432
        volumeMounts:
        - name: data
          mountPath: /var/lib/postgresql/data
          subPath: postgres
        resources:
          requests:
            memory: "1Gi"
            cpu: "500m"
          limits:
            memory: "2Gi"
            cpu: "1"
  volumeClaimTemplates:
  - metadata:
      name: data
    spec:
      accessModes: [ "ReadWriteOnce" ]
      storageClassName: longhorn-high-availability
      resources:
        requests:
          storage: 50Gi
ReadWriteMany Example with NFS
For workloads that need to access the same volume from multiple pods:
1
2
3
4
5
6
7
8
9
10
11
12
13
14
15
16
17
18
19
20
21
22
23
24
25
# First, deploy the NFS provisioner using Longhorn as backend
apiVersion: apps/v1
kind: Deployment
metadata:
  name: nfs-server
spec:
  # ...deployment details...
  volumes:
  - name: nfs-vol
    persistentVolumeClaim:
      claimName: longhorn-nfs-backend

---
# Then create a PVC that uses the NFS provisioner
apiVersion: v1
kind: PersistentVolumeClaim
metadata:
  name: shared-volume
spec:
  accessModes:
    - ReadWriteMany
  storageClassName: nfs-client  # Your NFS storage class
  resources:
    requests:
      storage: 10Gi
Configuring Backup and Disaster Recovery
Longhorn provides robust backup and disaster recovery features to safeguard your data. Setting up a proper backup system should be one of your first tasks after deploying Longhorn.
Setting Up External Backup Storage
Longhorn can back up volumes to external storage providers like S3-compatible object stores:
- In the Longhorn UI, navigate to Settings > Backup Target
- Configure your desired backup target:
For AWS S3:
1
2
Backup Target: s3://your-bucket-name@us-east-1/
Backup Target Secret: AWS_ACCESS_KEY_ID=xxx,AWS_SECRET_ACCESS_KEY=yyy
For MinIO or other S3-compatible storage:
1
2
Backup Target: s3://your-bucket-name@us-east-1/?endpointUrl=https://minio.example.com
Backup Target Secret: AWS_ACCESS_KEY_ID=xxx,AWS_SECRET_ACCESS_KEY=yyy
For NFS:
1
Backup Target: nfs://192.168.1.100:/path/to/backup-share/
Creating Backup Schedules
You can set up recurring backup schedules at the volume or storage class level:
Via Annotations for Individual PVCs:
1
2
3
4
5
6
7
8
9
10
11
12
13
14
15
16
17
18
19
20
21
22
23
24
25
apiVersion: v1
kind: PersistentVolumeClaim
metadata:
  name: database-pvc
  annotations:
    longhorn.io/recurring-backup: '[
      {
        "name":"daily-backup",
        "task":"backup",
        "cron":"0 2 * * *",
        "retain":7,
        "concurrency":1,
        "labels":{"tier":"production"}
      },
      {
        "name":"weekly-backup",
        "task":"backup",
        "cron":"0 3 * * 0",
        "retain":4,
        "concurrency":1,
        "labels":{"tier":"production"}
      }
    ]'
spec:
  # ...PVC spec...
Via Longhorn UI for All Volumes:
- Go to Setting > Recurring Jobs
- Click Create
- Configure job details:
- Name: daily-backup
- Type: Backup
- Schedule: 0 2 * * * (runs at 2 AM daily)
- Retain: 7 (keep last 7 backups)
- Groups: Select volume groups or leave empty for all volumes
Disaster Recovery Strategy
A comprehensive disaster recovery plan with Longhorn should include:
- Regular Backups: Set up daily or hourly backups depending on your RPO
- Backup Verification: Periodically restore backups to verify integrity
- Cross-Region Backup: Store backups in a different region
- Restore Testing: Practice restore operations as part of your DR drills
Implementing a Multi-Cluster Strategy
For critical workloads, consider setting up a DR cluster:
- Set up Longhorn in your secondary cluster
- Configure both clusters to use the same backup target
- In case of primary cluster failure:
- Create new volumes in the secondary cluster from backups
- Deploy applications in the secondary cluster
- Update DNS to point to the secondary cluster
Automating Volume Restore
Create a restore script that can automatically restore volumes from the latest backups:
1
2
3
4
5
6
7
8
9
10
11
12
13
14
15
16
17
18
19
20
21
22
23
24
#!/bin/bash
# Example restore script
BACKUP_NAME="latest"
VOLUME_NAME="critical-data"
BACKUP_URL=$(kubectl -n longhorn-system get backupvolume $VOLUME_NAME -o jsonpath='{.status.lastBackupName}')

# Create restore volume from backup
cat > restore-pvc.yaml << EOF
apiVersion: v1
kind: PersistentVolumeClaim
metadata:
  name: $VOLUME_NAME-restored
spec:
  storageClassName: longhorn-from-backup
  accessModes:
    - ReadWriteOnce
  resources:
    requests:
      storage: 10Gi
  annotations:
    longhorn.io/from-backup: $BACKUP_URL
EOF

kubectl apply -f restore-pvc.yaml
Performance Tuning
To get the best performance out of your Longhorn deployment, consider the following optimization strategies:
Hardware Considerations
- Dedicated Storage Nodes: For large clusters, consider having dedicated storage nodes with SSDs or NVMe drives
- Network Performance: Use at least 10Gbps networking between nodes for optimal replica synchronization
- Separate Disk for Longhorn: Never use the same disk for Longhorn that’s used by the operating system
- RAID Configuration: If using RAID, prefer RAID 10 over RAID 5/6 for write-intensive workloads
Resource Allocation
Configure appropriate resource limits and requests for Longhorn components:
1
2
3
4
5
6
7
8
9
10
11
12
13
14
15
16
17
18
# Example Helm values for resource configuration
longhornManager:
  resources:
    limits:
      cpu: 500m
      memory: 1Gi
    requests:
      cpu: 250m
      memory: 512Mi

longhornDriver:
  resources:
    limits:
      cpu: 300m
      memory: 512Mi
    requests:
      cpu: 100m
      memory: 256Mi
Volume Settings for Different Workloads
Different workloads require different configurations:
High-IOPS Database Workloads
- Increase
Frontend Reserve Memory(50MB to 100MB per volume) - Set
Data Localitytobest-effort - Use higher request/limit CPU values for instance manager pods
- Consider using
ext4filesystem withnoatimeoption
Log Collection Workloads
- Increase
Concurrent Replica Rebuilding - Set
Replica Replenishment Wait Intervalto a lower value - Use
xfsfilesystem for better sequential write performance
Monitoring Performance
Set up monitoring for Longhorn using Prometheus and Grafana:
- Enable Longhorn metrics in the settings panel
- Configure Prometheus to scrape Longhorn metrics
- Import the Longhorn Grafana dashboard
- Monitor key metrics:
- Volume IOPS and Throughput
- Replica Rebuild Time
- Engine CPU/Memory Usage
- Disk Latency
Advanced Optimization Tips
- Fine-tune I/O Settings:
1
2
3
4
5
6
defaultSettings:
  guaranteedEngineManagerCPU: 0.25
  concurrentReplicaRebuildPerNodeLimit: 5
  replicaSoftAntiAffinity: true
  storageOverProvisioningPercentage: 200
  storageMinimalAvailablePercentage: 10
-
Enable Fast RWX Support: If you need ReadWriteMany volumes with better performance, configure the built-in Share Manager with appropriate resource limits.
-
Use Volume Snapshots for Quick Backups: Combine CSI snapshots with backup to external storage for optimal backup performance.
- Regular Maintenance:
Schedule regular maintenance windows to:
- Purge old snapshots
- Perform storage block reclamation
- Check and fix volume consistency
- Upgrade Longhorn components during maintenance windows
By following these performance optimization strategies, you can ensure that your Longhorn storage system delivers the reliability and performance needed for production workloads.
Conclusion
Longhorn provides a robust solution for persistent storage in Kubernetes environments. With its built-in replication and backup features, it ensures your data remains available even when nodes fail. The simple web UI makes managing volumes and monitoring storage health straightforward, making it an excellent choice for both development and production environments.
For more details, visit the official Longhorn documentation.