Setting Up MetalLB: Kubernetes LoadBalancer for Bare Metal Clusters
A comprehensive guide to implementing MetalLB to enable LoadBalancer services in your on-premise Kubernetes cluster without cloud provider integration.
Why MetalLB?
In Kubernetes, the LoadBalancer service type is designed to expose your applications to external traffic by automatically provisioning a load balancer from your cloud provider (AWS, GCP, Azure, etc.). However, when running Kubernetes on bare-metal or in on-premise environments, this functionality is missing. Without a cloud provider integration, your LoadBalancer services will remain indefinitely in the pending state.
Traditionally, bare-metal cluster operators have been limited to:
- NodePort services - Exposing applications on high-numbered ports (30000-32767) on all nodes, which is awkward for users and often requires additional port forwarding.
- externalIPs services - Manually managing IP assignments, which becomes unwieldy at scale.
- Ingress controllers without LoadBalancer support - Requiring complex workarounds to expose the controller itself.
This creates a significant gap in functionality between cloud-based and on-premise Kubernetes deployments.
MetalLB solves this problem by providing a network load balancer implementation specifically for bare-metal Kubernetes clusters. It uses standard networking protocols to integrate with your existing infrastructure, making LoadBalancer services “just work” in any environment.
“MetalLB bridges the gap between cloud and bare-metal, ensuring a consistent Kubernetes experience regardless of infrastructure.”
Prerequisites
Before installing MetalLB, ensure you have:
- A working Kubernetes cluster (v1.19.0 or newer)
kubectlconfigured to access your clusterhelminstalled (optional, for Helm-based installation)- Allocated IP addresses:
- For L2 mode: A range of unused IP addresses on the same subnet as your cluster nodes
- For BGP mode: IP addresses and ASN numbers for your network and routers
- Network requirements:
- For L2 mode: Allow traffic on port 7946 (TCP & UDP) between nodes for memberlist
- For BGP mode: Allow BGP protocol (TCP port 179) between nodes and routers
- RBAC permissions to create cluster-wide resources
Installing MetalLB
You have two primary methods for installing MetalLB: using standard Kubernetes manifests or using Helm. Let’s explore both options.
Step 1: Enable Strict ARP Mode
If you’re using kube-proxy in IPVS mode (which is common in high-performance clusters), you must enable strict ARP mode first:
Note: If you’re using kube-router as service proxy, skip this step as it enables strict ARP by default.
1
2
3
4
5
6
7
8
9
# See what changes would be made (returns non-zero if different)
kubectl get configmap kube-proxy -n kube-system -o yaml | \
sed -e "s/strictARP: false/strictARP: true/" | \
kubectl diff -f - -n kube-system

# Apply the changes if needed
kubectl get configmap kube-proxy -n kube-system -o yaml | \
sed -e "s/strictARP: false/strictARP: true/" | \
kubectl apply -f - -n kube-system
Step 2: Install MetalLB
Option A: Using Kubernetes Manifests
This approach installs MetalLB directly using the official manifests:
1
2
3
4
5
6
7
8
# Get the latest version of MetalLB
METALLB_VERSION=$(curl -s https://api.github.com/repos/metallb/metallb/releases/latest | jq -r .tag_name)

# Download the manifest
wget https://raw.githubusercontent.com/metallb/metallb/${METALLB_VERSION}/config/manifests/metallb-native.yaml

# Apply the manifest
kubectl apply -f metallb-native.yaml
Option B: Using Helm
Helm provides a more managed approach with easier upgrades:
1
2
3
4
5
6
7
8
# Add the MetalLB Helm repository
helm repo add metallb https://metallb.github.io/metallb

# Update Helm repositories
helm repo update

# Install MetalLB
helm install metallb metallb/metallb -n metallb-system --create-namespace
Verify that MetalLB pods are running properly:
1
kubectl get pods -n metallb-system
Expected output:
1
2
3
4
5
6
NAME                          READY   STATUS    RESTARTS   AGE
controller-7dcc8764f4-xsz9p   1/1     Running   0          45s
speaker-dwrb5                 1/1     Running   0          45s
speaker-jv4f7                 1/1     Running   0          45s
speaker-kklpg                 1/1     Running   0          45s
speaker-v5gfn                 1/1     Running   0          45s
MetalLB consists of two main components:
- Controller: The central management component that assigns IP addresses to services
- Speaker: A DaemonSet that runs on each node and announces the service IPs using L2 or BGP
Step 3: Configure MetalLB Address Allocation
MetalLB requires configuration to know which IP addresses it can assign to LoadBalancer services. This is done through two custom resources:
- IPAddressPool: Defines the available IP addresses
- L2Advertisement or BGPAdvertisement: Defines how these IPs are announced to the network
Creating an IP Address Pool
Let’s create a basic L2 configuration:
1
2
3
4
5
6
7
8
9
10
11
12
13
14
15
16
17
18
19
20
21
22
23
24
25
26
27
28
29
30
31
cat <<EOF > metallb-config.yaml
apiVersion: metallb.io/v1beta1
kind: IPAddressPool
metadata:
  name: first-ip-address-pool
  namespace: metallb-system
spec:
  # Define one or more IP address ranges
  addresses:
  - 192.168.201.137-192.168.201.139
  # Optional: Avoid the first and last IPs in the range (often used for network/broadcast)
  # avoidBuggyIPs: true
  # Optional: Control automatic IP assignment
  # autoAssign: true
---
apiVersion: metallb.io/v1beta1
kind: L2Advertisement
metadata:
  name: layer2-advertisement
  namespace: metallb-system
spec:
  # Reference the IP address pool(s) to advertise
  ipAddressPools:
  - first-ip-address-pool
  # Optional: Announce only to specific network interfaces
  # interfaces:
  #  - eth0
EOF

# Apply the configuration
kubectl apply -f metallb-config.yaml
Verify the configuration:
1
kubectl get ipaddresspools.metallb.io -n metallb-system
Expected output:
1
2
NAME                    AUTO ASSIGN   AVOID BUGGY IPS   ADDRESSES
first-ip-address-pool   true          false             ["192.168.201.137-192.168.201.139"]
Check advertisement configuration:
1
kubectl get l2advertisements.metallb.io -n metallb-system
Expected output:
1
2
NAME                  AGE
layer2-advertisement  30s
IP Address Pool Options
You can define multiple IP ranges in different formats:
1
2
3
4
spec:
  addresses:
  - 192.168.100.0/24        # CIDR notation
  - 172.20.20.30-172.20.20.50  # Range notation
Advanced Configuration
For production environments, you might want to:
- Create multiple pools with different purposes:
1
2
3
4
5
6
7
8
9
10
11
12
13
14
15
16
17
apiVersion: metallb.io/v1beta1
kind: IPAddressPool
metadata:
  name: production-services
  namespace: metallb-system
spec:
  addresses:
  - 192.168.10.0/24
---
apiVersion: metallb.io/v1beta1
kind: IPAddressPool
metadata:
  name: development-services
  namespace: metallb-system
spec:
  addresses:
  - 192.168.20.0/24
- Specify pools in service definitions using the
metallb.universe.tf/address-poolannotation:
1
2
3
4
5
6
7
8
9
apiVersion: v1
kind: Service
metadata:
  name: important-service
  annotations:
    metallb.universe.tf/address-pool: production-services
spec:
  type: LoadBalancer
  # ... rest of service definition
Step 4: Create a LoadBalancer Service
Now that MetalLB is properly installed and configured, let’s test it by creating a LoadBalancer service. We’ll use NGINX as a simple example.
Creating the Test Deployment and Service
Create a file named nginx-deployment.yaml with a Deployment and Service:
1
2
3
4
5
6
7
8
9
10
11
12
13
14
15
16
17
18
19
20
21
22
23
24
25
26
27
28
29
30
31
32
33
34
35
36
37
38
39
40
41
42
43
44
45
46
47
apiVersion: apps/v1
kind: Deployment
metadata:
  name: nginx-deployment
  labels:
    app: nginx
spec:
  replicas: 2
  selector:
    matchLabels:
      app: nginx
  template:
    metadata:
      labels:
        app: nginx
    spec:
      containers:
      - name: nginx
        image: nginx:stable
        ports:
        - containerPort: 80
        resources:
          requests:
            memory: "64Mi"
            cpu: "100m"
          limits:
            memory: "128Mi"
            cpu: "200m"
---
apiVersion: v1
kind: Service
metadata:
  name: nginx-service
  labels:
    app: nginx
  # Optional: Request a specific IP
  # annotations:
  #   metallb.universe.tf/loadBalancerIPs: 192.168.201.137
spec:
  type: LoadBalancer
  ports:
  - port: 80
    targetPort: 80
    protocol: TCP
    name: http
  selector:
    app: nginx
Apply the manifest:
1
kubectl apply -f nginx-deployment.yaml
Verifying the LoadBalancer Service
Check that the service has been created and assigned an external IP:
1
kubectl get svc nginx-service
You should see output similar to:
1
2
NAME           TYPE           CLUSTER-IP       EXTERNAL-IP       PORT(S)        AGE
nginx-service  LoadBalancer   10.110.147.188   192.168.201.137   80:31509/TCP   45s
The EXTERNAL-IP field shows the IP address assigned by MetalLB from your configured IP pool. This is your externally accessible endpoint.
Testing Connectivity
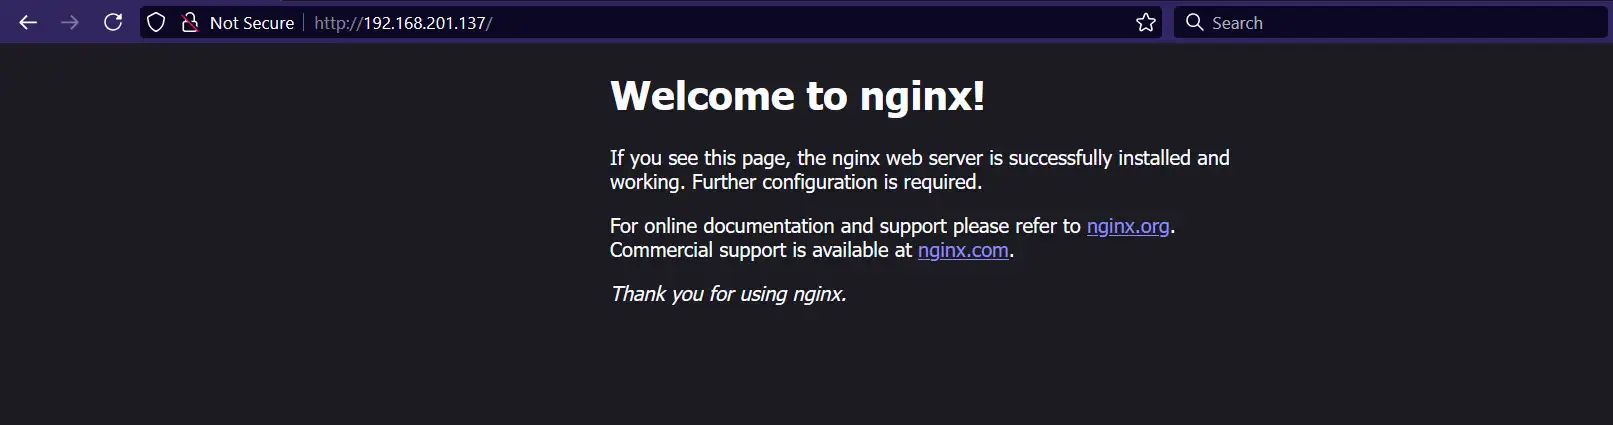
Test the service by accessing the external IP from any machine on your network:
1
2
curl http://192.168.201.137
# Or open in a browser
You should see the default NGINX welcome page:
What’s Happening Behind the Scenes
When you create a LoadBalancer service:
- The MetalLB controller assigns an IP address from your configured pool
- The MetalLB speaker components advertise this IP address using either:
- L2 mode: ARP announcements for IPv4 or NDP for IPv6
- BGP mode: Standard BGP routing announcements
- Traffic to this IP is routed to the appropriate Kubernetes node
- kube-proxy then routes the traffic to the appropriate pod
This provides a seamless external access experience similar to cloud environments.
Troubleshooting MetalLB
If you encounter issues with your MetalLB setup, here are some common problems and solutions:
Services Stuck in Pending State
If your LoadBalancer service is stuck with no external IP:
1
2
3
4
5
# Check the MetalLB controller logs
kubectl logs -n metallb-system -l app=metallb,component=controller

# Check the speaker logs on a specific node
kubectl logs -n metallb-system -l app=metallb,component=speaker
Common issues:
- IP pool configuration - Ensure your IP address pool contains valid addresses
- Advertisement not created - Verify you’ve created both IPAddressPool and L2Advertisement/BGPAdvertisement resources
- Network conflicts - Make sure your IP range doesn’t conflict with existing network services
ARP/NDP Issues in L2 Mode
If clients can’t reach the LoadBalancer IP:
- Check if traffic is allowed between nodes on port 7946
- Verify there are no IP conflicts in your network
- Test with a simple ping from a client machine to the LoadBalancer IP
- Check for potential network security policies blocking traffic
1
2
# Check that MetalLB can announce correctly
kubectl get events -n metallb-system
BGP Issues
For BGP mode troubleshooting:
1
2
# Check BGP session status
kubectl get bgppeer.metallb.io -n metallb-system
Common BGP issues:
- Incorrect ASN numbers
- Misconfigured router BGP settings
- Network policies blocking TCP port 179
- Incompatible BGP features between MetalLB and your routers
Comparing Kubernetes Service Types
| Feature | ClusterIP | NodePort | LoadBalancer (with MetalLB) | Ingress + MetalLB |
|---|---|---|---|---|
| Network Exposure | Cluster-internal only | External via node IPs | External with dedicated IPs | External with host-based routing |
| Port Restrictions | Any port | 30000-32767 range | Any port | Typically 80/443 |
| IP Management | Cluster IP only | Node IPs | Dedicated external IPs | Single IP for multiple services |
| Use Case | Internal services | Dev/testing | Production external services | Multiple HTTP/HTTPS services |
| DNS Integration | Service DNS | Service DNS | Service DNS | Hostname-based routing |
| Configuration Complexity | Low | Low | Medium | High |
Beyond Basic Setup
For production deployments, consider these advanced configurations:
Layer 2 Mode vs BGP Mode
Layer 2 Mode (what we implemented):
- Simpler to set up
- Works in most environments
- Uses ARP/NDP protocols
- Limited to a single L2 domain
- No load distribution across nodes
BGP Mode:
- More complex setup
- Requires BGP-capable routers
- Better scaling and failover
- True load balancing capabilities
- Works across L3 networks
High Availability Considerations
For production workloads:
- Configure multiple speakers - Ensure speakers are running on multiple nodes
- Use anti-affinity rules - Prevent controllers from running on the same node
- Implement redundant ranges - Configure fallback IP pools
- Monitor MetalLB components - Set up Prometheus monitoring for the MetalLB components
Conclusion
MetalLB fills a critical gap in the Kubernetes ecosystem by providing a true LoadBalancer implementation for bare-metal environments. By following this guide, you now have:
- A functioning MetalLB installation that assigns external IPs to your services
- The ability to expose Kubernetes applications with standard LoadBalancer services
- A foundation for building more complex networking solutions
This setup eliminates the need for awkward NodePort configurations or manual IP management, bringing the same level of networking convenience to on-premise clusters that cloud users enjoy.
For larger deployments, consider exploring BGP mode, which offers more sophisticated load balancing and integration with enterprise networking equipment. You can also leverage MetalLB with Ingress controllers to create comprehensive application routing solutions.
For more information and advanced use cases, refer to the official MetalLB documentation.
Did you find this guide helpful? Have questions about implementing MetalLB in your environment? Let me know in the comments!